Multimedia: Installing Kaltura Capture Screen Recording Software & First Use Note
Log into Blackboard—select Tools>My Media.


Download for Windows -The file type .msi.
Locate the downloaded file on your computer. (If unsure, check the Downloads folder first.)
Open/run it. (You may receive a security warning in Windows, but proceed.)
Select the Next button in the Setup Wizard screens until you get to an Install button, and then select that.
The application should then be installed in your Programs folder, and there should also be a ‘Kaltura Capture’ shortcut created on your desktop.
Download for Mac (2). When prompted, save the file to your computer. The file type .dmg is for Mac.Locate the downloaded file on your computer and open/run it. On Windows, you may receive a security warning, but go ahead and proceed. On Mac, drag the Kaltura Capture icon into your Applications folder.
If you’re on Mac, the Kaltura Capture program should now be installed in your Applications folder. You can drag the icon from your Applications folder to your Dock on the desktop to create a shortcut to it. Done!
Important! First Recording Notes
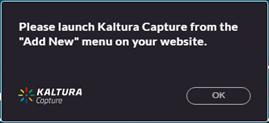
The first time you use Kaltura Capture, this pop up notice will display.
Go to My Media and select the blue Add New button on the right.
Select Kaltura Capture from the drop-down menu that appears.

The Kaltura Capture Desktop Recorder page appears and should automatically try to launch Kaltura Capture from the browser.
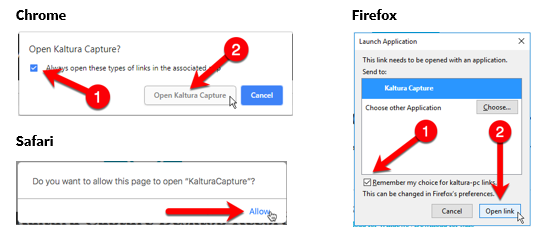
Select the "Open link" or "Allow" option.
Kaltura Capture will launch.
The first use is the only time you will perform these steps. After the first use, you will be able to access Kaltura Capture by accessing the recorder from the application icon.